the texture effect
the texture effect
vectors
folds
sound
particle system
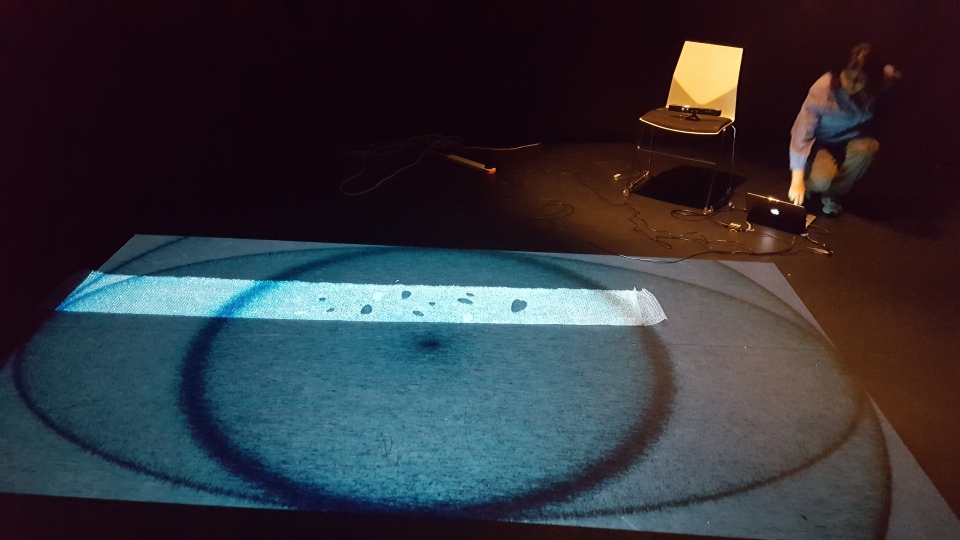
kinect mandala making
inspired by a cut tree and planning on which is the best color effect for the particle system


with thanks to Peter we tried adjusting the lights,


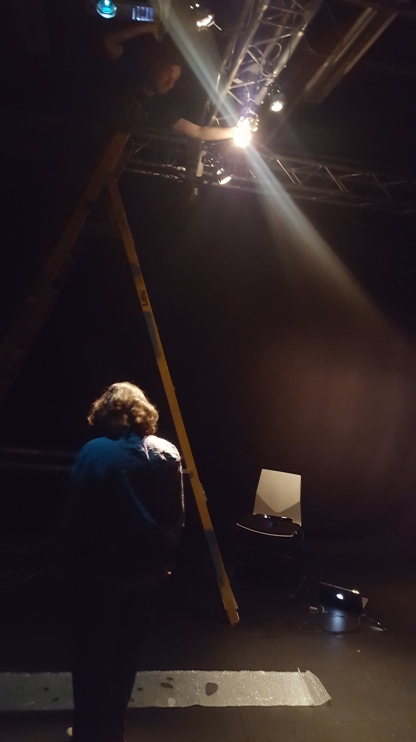
deciding which surface is best for the projection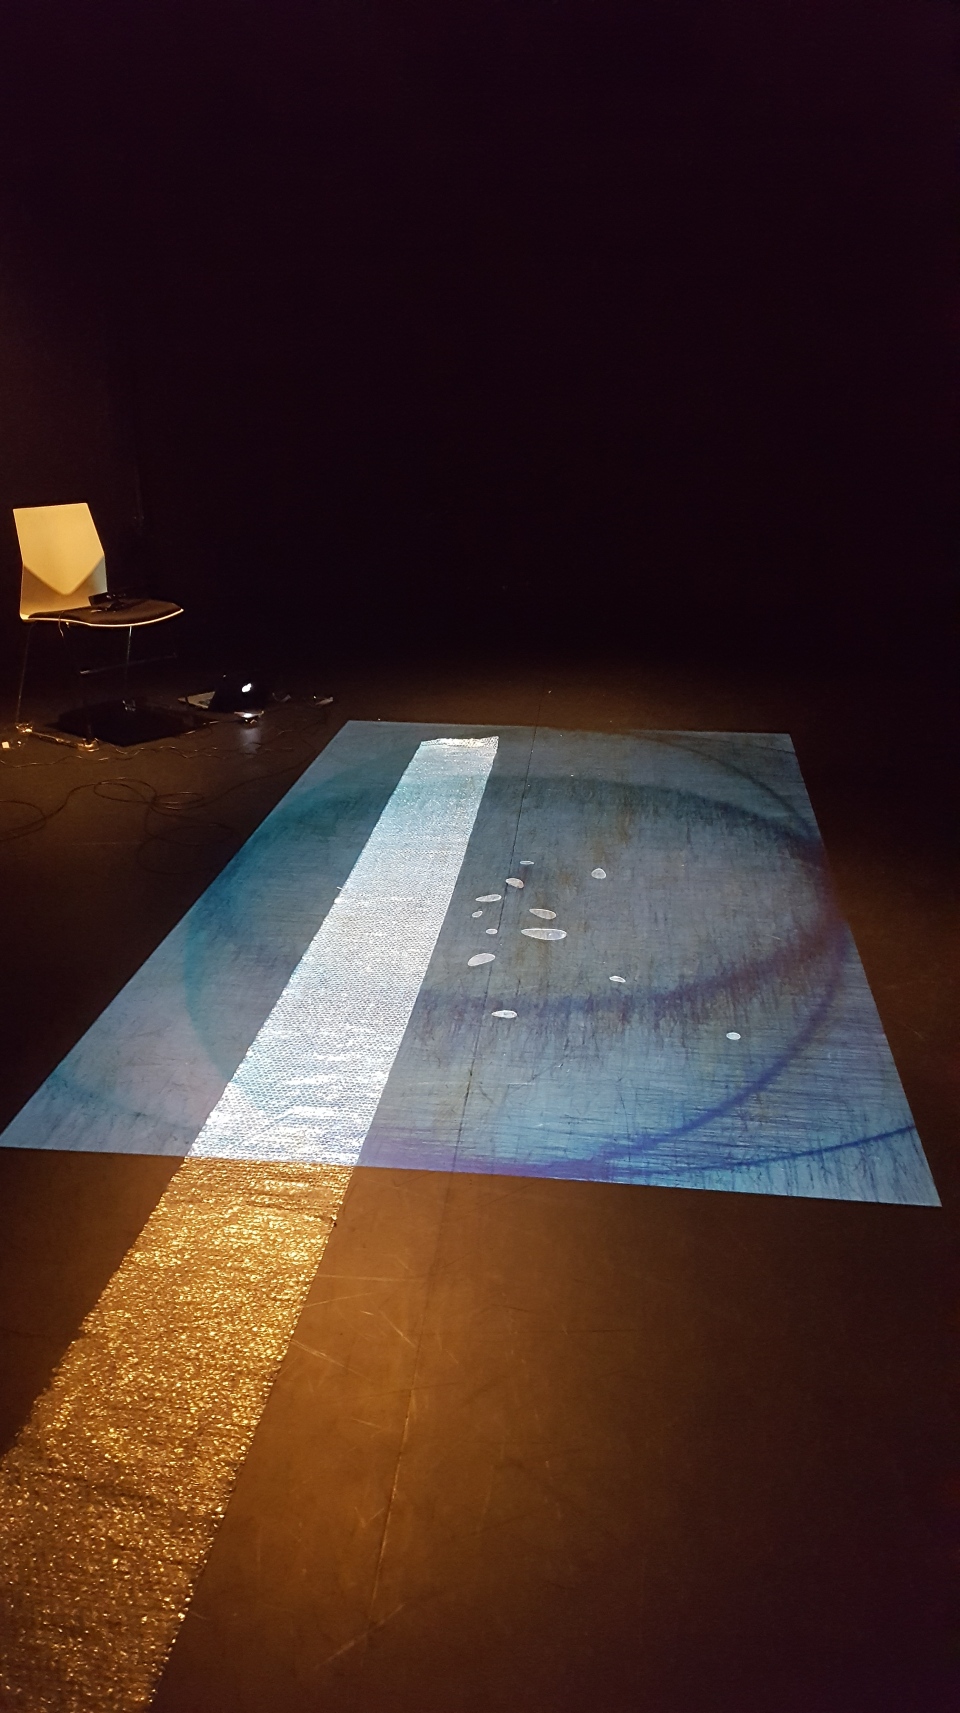

loved the effect of projecting on bubble warp … but maybe in some next project
making the platform and borrowing plinth

// Optical Flow 2010/05/28
// Hidetoshi Shimodaira shimo@is.titech.ac.jp 2010 GPL
same and modified in his code
“Entanglement”
Submission: 7 September 2017
Aspiration:
Entanglement is an Interactive Floor Projection derived from a passage a friend shared “Quantum entanglement is a physical phenomenon that occurs when pairs or groups of particles are generated or interact in ways such that the quantum state of each particle cannot be described independently of the others, even when the particles are separated by a large distance—instead, a quantum state must be described for the system as a whole.” Where we can talk about night and day each cannot exist without the other yet they can not be together at the same time; partly romantic and since then, particles in quantum state have been a source of inspiration, aspiration in concluding of my final project.
Research:
Sites:
https://www.youtube.com/watch?v=Kr4s5sLoROY&t=10s
http://idav.ucdavis.edu/~okreylos/ResDev/Kinect/MainPage.html
https://qu.wordpress.com/tag/interactive-authoring/page/3/
https://www.youtube.com/watch?v=g6N9Qid8Tqs
https://www.quantamagazine.org/entanglement-made-simple-20160428
https://www.livescience.com/28550-how-quantum-entanglement-works-infographic.html
http://mayerempl.wordpress.com/
Thoughts:
Approach:
Data is collected from bypassing viewers are taken from Kinetic. The data is representation, in form of particles which with Optic Flow interact with the silhouettes of the viewer/s. This output/interaction is displayed on the floor.

Programs Used:
Processing 2.2.1
Arduino 1.8.3
Addons/Libraries:
Kinetic
Optical Flow
Particle System
Tools:
Computer
Kinect
Projector
Physical Computing:
FSR
Servo Motors
Prototypes:
3D Printing

Laser Cutting


FSR and SERVO
Kinect
ADD THE MANDALA DRAWN BY KINECT VIDEO
Particle System:
Optic Flow:
Took the project for a test run phase 0

Final:
Algorithm Study
Final:
Clips and Videos
Concept:
The out-look of individual is always changing. We are changing not only our outlook rather we are playing different roles.
Project:
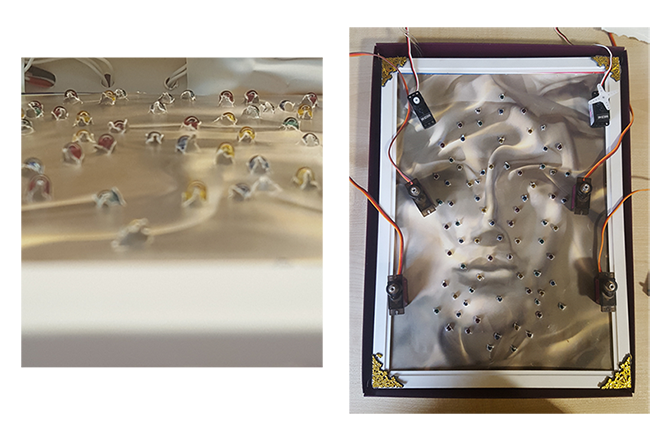
Based on the concept, my project is going to be based on a portrait with lights placed underneath creating illusion of changing. Strips will be going across the work, moving.
Materials:
Tracing sheet / Sheets
Frame
Boxes /Board sheet
Led Lights with external circuit
Servo motors with Arduino
Mehrbano Khattak 33429357
Physical Computing IS71065A (2016-17) Phoenix Perry


Mehrbano Khattak
Student ID 33429357
Week 01 Assignments:
Week 02 Assignments:
Week 03 Assignments:
Jade Smith Hall, Nadia Rahat, Mehrbano Khattak
PROJECT INTRODUCTION:
Our project is called Twinkle-B. It is a Special needs toy that detects stress and anxiety in young children on the autistic spectrum. Many children on the spectrum find it difficult to communicate, leading to frustration and sometimes what is known as a meltdown. The idea behind Twinkle-B is to allow the child to visually see how they are feeling by using a ‘galvanic skin response’ sensor and LED lights. Although the product is in its first steps, it will eventually be able to measure other kinds of emotions and visually record it. Not only will the child be able to see it, but the parent will be able to see and record the emotions through the output. Most of all it is done in a fun yet simple way!
Starting the Project
having a video conference


the first working model


Trying to work with micro board


PROJECT STEPS:
Final Video
The Code
//This code will change the colour of the LEDs depending on heat signitures but we want to later on make it detect anxiety levels.
//when the body is stressed, the heart and pulse beat faster and breathing becomes shallow. Many children on the autistic spectrum
//suffer from anxiety and stress, but often cannot verbalise how they are feeling.
//We wanted to create a toy to help children to understand visually in an interactive and fun way!
//inspired by the GSR tutorial on the ‘instrucables’ website
const int LED13 = 13;
const int LED12 = 12;
const int LED11 = 11;
const int LED10 = 10;
const int LED9 = 9;
const int LED8 = 8;
const int LED7 = 7;
const int LED6 = 6;
const int LED5 = 5;
const int LED4 = 4;
const int LED3 = 3;
const int LED2 = 2;
const int GSR=A2; // GSR connected to analog 2
int begin=0; //
int emoLvl;
byte blot = 0;
void setup(){
long cal = 0;
Serial.begin(9600);
pinMode(LED13,OUTPUT);
pinMode(LED12,OUTPUT);
pinMode(LED11,OUTPUT);
pinMode(LED10,OUTPUT);
pinMode(LED9,OUTPUT);
pinMode(LED8,OUTPUT);
pinMode(LED7,OUTPUT);
pinMode(LED6,OUTPUT);
pinMode(LED5,OUTPUT);
pinMode(LED4,OUTPUT);
pinMode(LED3,OUTPUT);
pinMode(LED2,OUTPUT);
digitalWrite(LED13,LOW);
digitalWrite(LED11,LOW);
digitalWrite(LED9,LOW);
digitalWrite(LED7,LOW);
digitalWrite(LED5,LOW);
digitalWrite(LED3,LOW);
digitalWrite(LED12,HIGH);
digitalWrite(LED10,HIGH);
digitalWrite(LED8,HIGH);
digitalWrite(LED6,HIGH);
digitalWrite(LED4,HIGH);
digitalWrite(LED2,HIGH);
delay(1000);
for(int i=0;i<500;i++)
{
emoLvl=analogRead(GSR);
cal += emoLvl;
delay(5);
}
begin = cal/500;
Serial.print(“begin =”);
Serial.println(begin);
}
void loop(){
int heat; //temperature variable
emoLvl=analogRead(GSR); //read the values from the GSR
Serial.print(“Calculating emotion=”); // Output the values from the GSR
Serial.println(emoLvl);
heat = begin – emoLvl;
if(abs(heat)> 60){
emoLvl=analogRead(GSR); //then the emoLvl is whatever the GSR reads
heat = begin – emoLvl;
digitalWrite(LED13,HIGH);
digitalWrite(LED11,HIGH);
digitalWrite(LED9,HIGH);
digitalWrite(LED7,HIGH);
digitalWrite(LED5,HIGH);
digitalWrite(LED3,HIGH);
digitalWrite(LED12,LOW);
digitalWrite(LED10,LOW);
digitalWrite(LED8,LOW);
digitalWrite(LED6,LOW);
digitalWrite(LED4,LOW);
digitalWrite(LED2,LOW);
}
// when the user’s state changes, it goes back to the orignal values
// and the lights do the opposite thing
Serial.println(“I am feeling anxious!”);
delay(5000); // delay
digitalWrite(LED13,LOW);
digitalWrite(LED11,LOW);
digitalWrite(LED9,LOW);
digitalWrite(LED7,LOW);
digitalWrite(LED5,LOW);
digitalWrite(LED3,LOW);
digitalWrite(LED12,HIGH);
digitalWrite(LED10,HIGH);
digitalWrite(LED8,HIGH);
digitalWrite(LED6,HIGH);
digitalWrite(LED4,HIGH);
digitalWrite(LED2,HIGH);
delay(1000);
}
Research

https://www.adaptivetechsolutions.com/switch-adapted-toys/musical-light-up/

https://youtu.be/uqRLAln2-r8

http://www.autismspeaks.org/family-services/resource-library/toys-games Harris Communications

Website: http://www.harriscomm.com/catalog/default.php?cPath=1188_1190

Website: http://www.hearmore.com/store/default.asp

Website: http://www.rehabmart.com/category/Games_and_Toys_for_the_Deaf.htm

American Foundation for the Blind and National Association of Parents of Children with Visual Impairments.

Website: http://www.familyconnect.org/parentsitehome.asp?SectionID=83 American Printing House for the Blind

Website: http://www.aph.org/

SQUIDOO

Hearing Speech & Deafness Center

Sells AT for individuals with hearing loss including a books, games and specialty items for children!

Website: http://www.hsdcstore.com/ Sight Connection

Products for individuals with vision loss including games, watches and other fun devices.

Website: http://www.sightconnection.com
 I Am Malala: The Girl Who Stood up for Education and Was Shot by the Taliban. Little, Brown and Company, 2013
“I am Malala” is the true story of a fourteen-year old girl’s campaign for women’s right to education. In 2011 Malala was shot by the Taliban in a bus on her way home from school. Two men boarded the school bus—“Who is Malala” they asked and fired gun shots; two lodged in Malala’s head. The series of events that followed, described in Malala’s voice, are remarkable—the politics, the media frenzy and her recovery. The shooting triggered a complex series of negotiations involving prominent political figures from Pakistan and England. It’s a powerful book. Malala’s story is remarkable in light of women’s role in her culture and the groups fighting to oppress women—in this case the Taliban. It was the Taliban that claimed responsibility for shooting Malala calling…
View original post 688 more words
